Recipe in this post: CARROT & RICOTTA MUFFINS (4 portions)
Carrot Muffins
(600g carrots; 50g ricotta; 15g Parmesan cheese; 1 egg; additional nuts crumble or seeds for the decoration)
Steam the while carrots for about 15-20 minutes till they soften. Cut into batons.
Blitz the carrots with the ricotta cheese, the Parmesan, and the egg. You can use mascarpone cheese instead of the ricotta, if you want to get a richer taste.
Place the mix into paper-lined tins or a muffin tray and bake in hot oven at 180°C fan (400°F) for about 20 minutes.
Once cooked, let the muffins cool down and set for about 10 minutes.
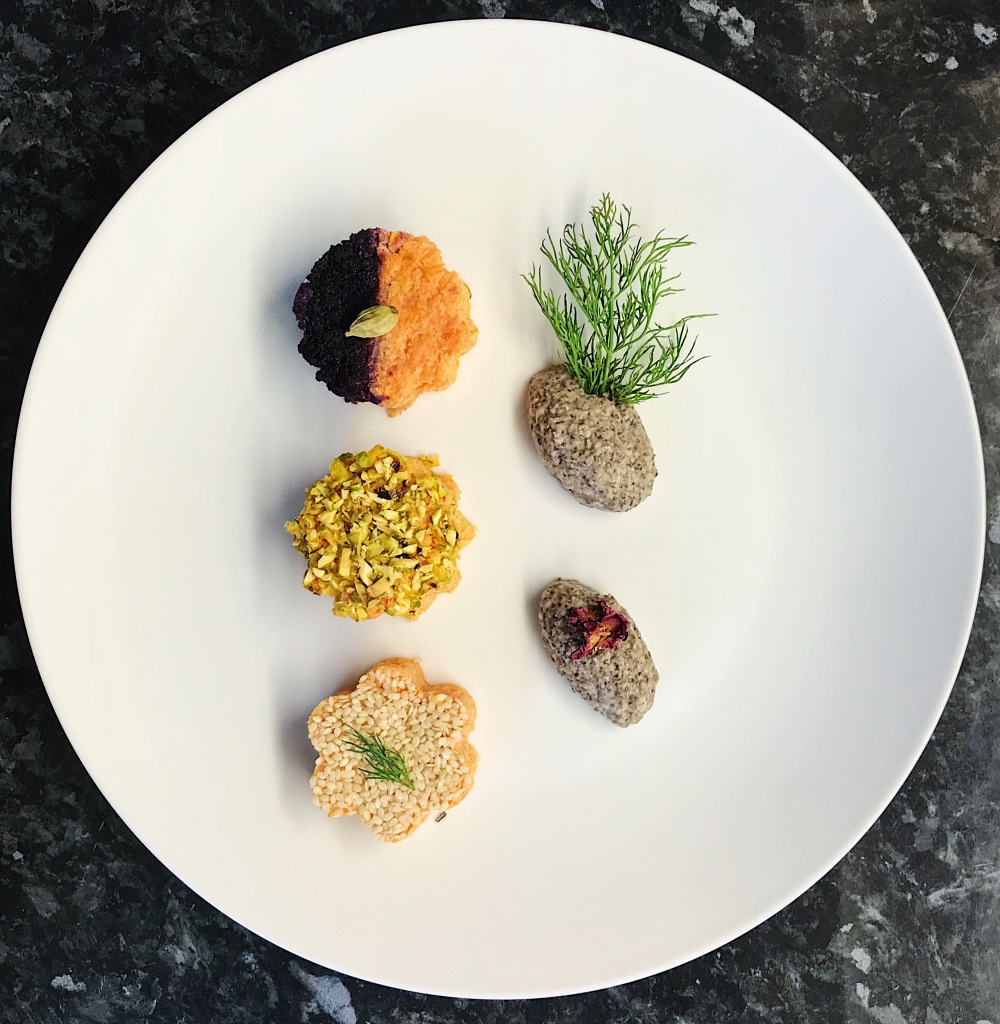
Add some texture and obtain a pleasant polychromatic effect with some pistachio crumb and sesame seeds decorating the top of the muffins, besides using carrots of different colours.
I originally designed this recipe when our child was about one year old and started proper weaning. The fluffiness of these muffins is perfect, even though I do like to elevate them with a combination on different textures, like the pistachio crumble and the sesame seeds in the picture. Adults love these muffins as well!
For the version in the image, I paired the muffins with a mushroom sorbet made with a mix of wild mushrooms, button mushrooms, and dill-infused mascarpone. The gentle sweetness of the carrot muffins works beautifully with the earthiness of the mushroom sorbet. Give it a go and let me know what you like to pair your muffins with!
Recipes in this post: PICI PASTA with CACIO & PEPE sauce (serves 4)
Pici (pasta)
(300g semolina; 70g all purpose flour; 35g strong white flour; 200 ml warm water; pinch of salt)
Cacio & Pepe sauce
(200g grated Tuscan pecorino cheese; black peppercorns & ground black pepper)
Prepare the PICI mixing the three flours and the warm water, with a pinch of salt. No eggs needed. Knead for about 10 minutes till the dough is smooth. Let it rest at room temperature for about half hour and then start to work the dough, flattening it into sheets about 0.7 cm high.
Cut long strips out of each sheet. With two hands and straight fingers, start ‘rolling’ these strips on the counter, from the centre of each strip moving towards the sides, till they become cylinders about 0.3 cm of diameter, similar to very thick spaghetti (see the picture below). While making pici, leave them to rest on a tea towel sprinkled with semolina to avoid sticking.
Bring a pot of water (slightly salted) to a boil. Start the CACIO & PEPE sauce crushing the peppercorns in a hot pan, letting them toast for a few minutes, finishing them off with a spoon of boiling water. Then, add the toasted peppercorns to a bowl with half of the grated pecorino, and add a ladle of cooking water; whisk till you obtain a smooth, silky cream–keep this warm.
Cook the pici in the boiling water for about 8 minutes, drain, and transfer to the bowl with the pecorino cream. Add the remaining grated pecorino cheese and loads of ground black pepper. Mix all together.
Create nests of pici twisting the pasta in a ladle with kitchen tongs. Decorate with micro basil leaves for a fresh, balsamic touch.
Pici are one of the oldest pasta, with their ancestors appearing on banquet scenes in Etruscan burial frescos. Today, pici are officially linked with the food tradition of Siena, in Tuscany. The word ‘pici‘, or ‘pinci‘, (plural of ‘picio‘ or ‘pincio‘ respectively), comes from the gesture used to make them, ‘appicciare‘, i.e. hand rolling the pasta dough strips into the thin, long cylinders tapering at their extremities–see the image above.
Pici are exceptionally tasty in their simplicity. One of the most traditional ways to enjoy them is with aglione, a spicy garlic and tomato sauce, or with game ragù, as hunting hare and wild boar is common in the valleys of the Tuscan Appennino. My favourite classic sauce for pici is cacio e pepe, as in my recipe here. It is as simple as divine. Don’t be stingy on the pecorino cheese (use a Tuscan one) and you won’t regret it!
– for a single serve like this, divide all quantities by 8 –
Dice one apple (or two, if quite small) and gently pan-fry on a butter-greased pan with the sugar, only for a couple of minutes, till they soften and start to glaze. Let them cool down.
Meanwhile, make the frangipane, mixing together custard, almond flour, and ground cinnamon in a bowl.
Stretch the shortcrust pastry to your tin size (I used a squared tin, 23 cm side), leaving about a border 1.5 cm tall, in order to create the edges of the tart. Dock the pastry base with a fork. Add the cooked apple to the frangipane and cover the pastry base with this mix.
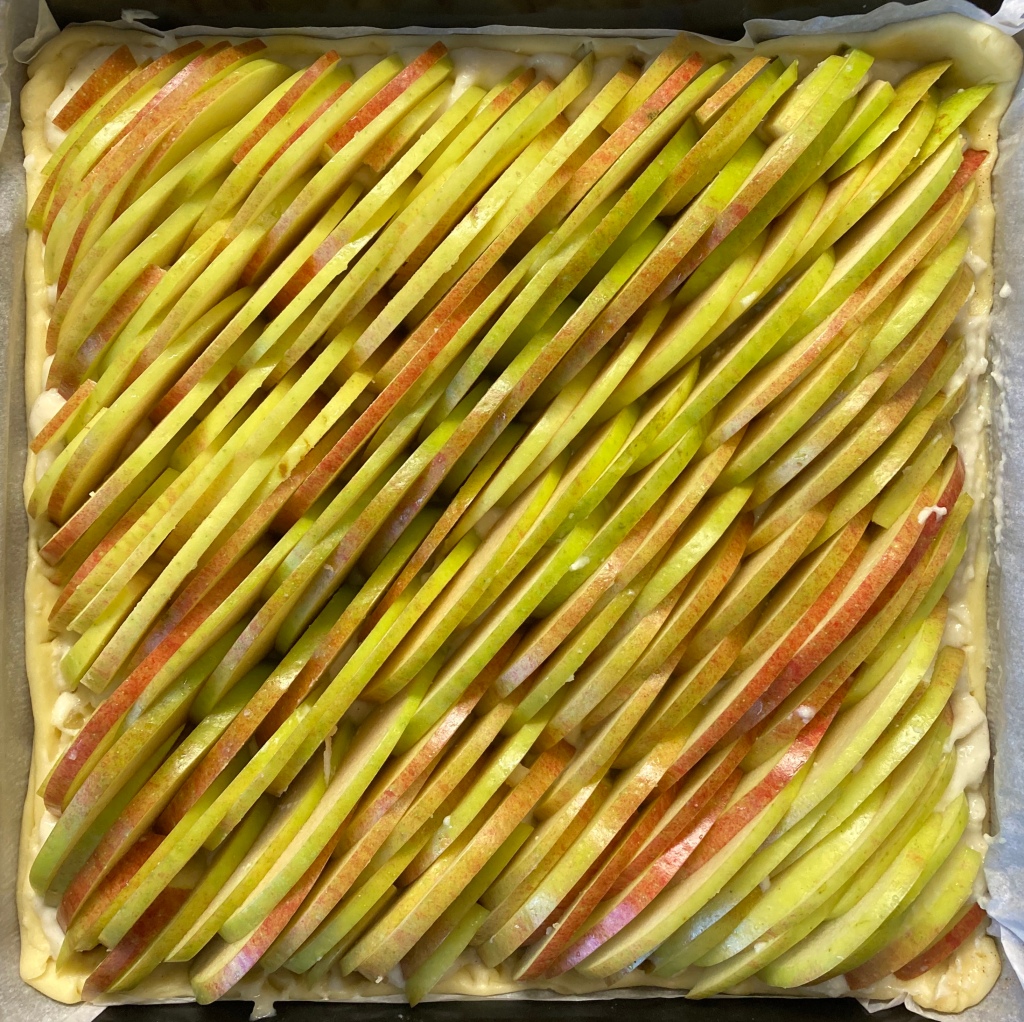
Slice the rest of the apples as evenly as possible and place over the frangipane mix. You can arrange them either by length to recreate a visual effect similar to Hasselbacken potato, or layer the apple slices like I did in the single serve tart, pictured above.
Bake in hot oven at 180°C fan (400°F) for about 26 minutes–the tart is ready when the pastry is golden. Finish off with an additional sprinkle of ground cinnamon and even some lemon zest.
This is such an easy recipe, fast, and a guaranteed success. This tart is fun to assemble and the apple slices’ decoration offers a great chance to express one’s creativity. You should try this at home!
Frangipane apple tarts are now a staple at home and at the deli in Camden (The Camden Grocer) where I am working and cooking as their food consultant. If you are passing by the Market, don’t be shy and come get yours!
Warm up the oven to 160ºC fan (350ºF). While it gets to temperature, put the pecan nuts inside with a pinch of salt and sugar for about 10 minutes; let them cool down once done.
Mix the vegetable oil, sugar, and eggs in a large mixing bowl until you obtain a smooth mix. Add the flour, soda bicarbonate, salt, and ground cinnamon to the mix, keeping it as smooth as possible. Grate the carrots over the mix, add the toasted nuts and the zest of 1 orange. Pour the mix inside a lined round tin (26 cm/10″ diameter).
Bake in hot oven at 160°C fan (350°F) for 1 hour 20 minutes. Let cool down outside the oven inside the tin for about 10 minutes and then another 10 minutes without the tin.
Prepare the buttercream: mix the softened butter with the sugar first, add mascarpone and cream cheese (if you haven’t got access to mascarpone, you can use 350g of cream cheese), and place in two piping bags in the fridge to chill–you can do this operation while the cake bakes and cools down.
Slice the cake horizontally into two discs. Use one of the two buttercream piping bags to cover the bottom disc, cover with the second disc, and decorate the latter with the second piping bag of buttercream. I also add a thin rim of 1 freshly grated carrot on the edge to complete the decoration.
The first time I wrote this recipe, I was nervous about the feedback, because here in UK you can never go wrong with a carrot cake, as long as it is perfect! I first tested it with a few friends who grew up in West London and had carrot cake often enough to judge every aspect of it, mercilessly. Luckily, my cake passed the test with full marks.
With this recipe, the cake is moist yet with a good spongy bite. You can feel the carrots’ texture, as they are grated fresh into the mix. The pecan nuts are well balanced and add that yummy crunch here and there in the dough, while the cinnamon and orange perfumes intertwine in the nose. My Italian-tainted buttercream, made with a part of mascarpone, was also happily received, and it does work well without any vanilla, just the way it is. Try the recipe and let me know! Success is guaranteed!
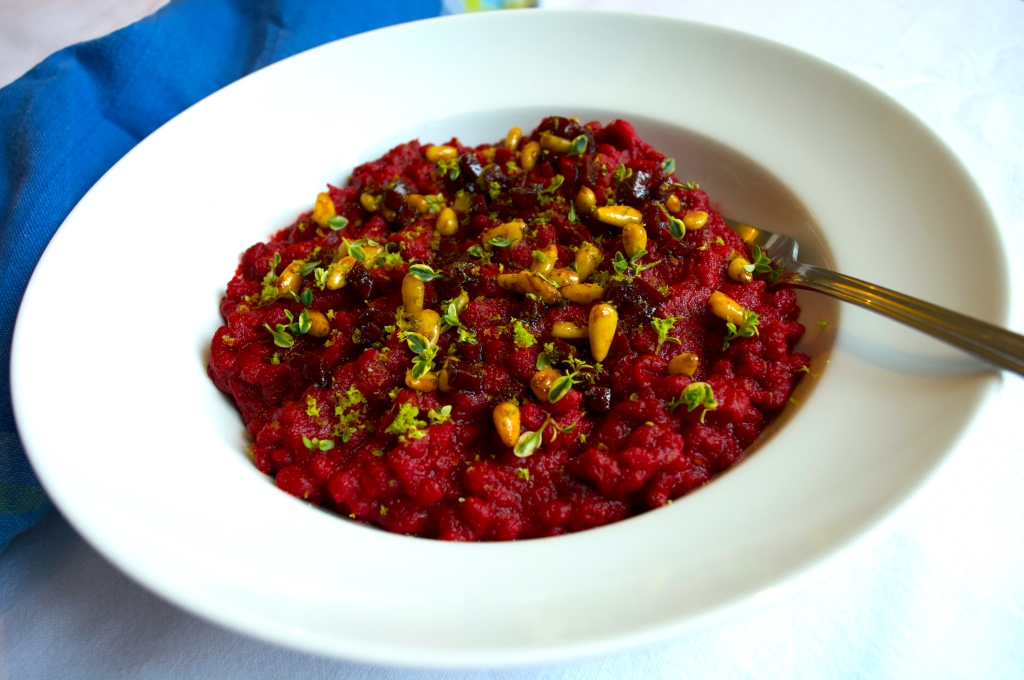
Recipe in this post: BEETROOT ORZOTTO with caramelised chorizo, pine kernels & lime perfumes (serves 2 or makes a great starter for 4)
Beetroot Orzotto
(200g pearl barley; 1L broth; 2 beetroots; 1 tsp ground coriander; 30g chorizo; 2 tbsp balsamic vinegar; 1 lime zest; lemon thyme; 2 tbsp pine kernels; 1 onion; EVO oil; salt; a splash of cow/oat milk)
Gently pan fry half onion slices in EVO oil till golden brown, then add the pealed and diced beetroots with the other half onion and some ground coriander. Sauté for about 10 minutes till they start to glaze.
Once cooled a bit, blitz the cooked beetroots with a food processor. If they remain too thick, you can add a splash of EVO oil or a little bit of cow/oat milk to smoothen the compound.
Quickly toast the pearl barley in some EVO oil for about 2 minutes. Start to cook the orzotto covering the barley with a ladle of broth at a time and keeping it on medium-high heat. Add the blitzed beetroots to the barley with more ladles of broth. Cook the barley till all the broth is absorbed, which is about 20-30 minutes in total, depending on the consistency you want to obtain.
In the meantime, dice the chorizo in small cubes and sauté them in the balsamic vinegar with the pine kernels and the lemon thyme, till the vinegar is reduced and the chorizo is shimmering.
Serve the orzotto mixing in the chorizo cubes balsamic reduction with the pine kernels, and garnish with leaves of lemon thyme and the lime zest.
Orzotto is a great alternative to risotto, very common in the north-east of Italy. The word itself is a blending of ‘orzo’, Italian for barley, and ‘risotto’. Do not confuse it with a pasta shape called ‘orzo’, which are a wheat pasta shaped like rice grains–in fact we call these ‘risoni’, i.e. big rice grains, in Italy.
Orzotto tends to be slightly crunchier than risotto, even though barley gives that sort of sponginess at the same time. I like to cook it al dente, but it is not uncommon to find it cooked for longer in order to get a softer feel of the grains. Because of its consistency, I like to use it in combination with different textures, such as the crunchy chorizo dices and the pine kernels in this recipe. You can make an orzotto with pretty much anything, from vegetables to fish and even meat like sausages and speck.
Roast the aubergines at 180ºC fan (400ºF) for about 40 minutes; let cool down and peel the skins;
Dice the aubergine pulp and place it on a sieve; squash the pulp with a fork to remove the water inside;
Mix the pulp with the egg, a pinch of salt, the flour, and add the cheese last;
Shape the dough as you please: you can make cubes like I did, or form the more traditional dumplings;
Boil the gnocchi in salty water, as you would do for pasta, and take them out when they are starting to float; serve with warm butter, toasted pine kernels and sage leaves.
Gnocchi are such a rewording meal. I love to make them in many different ways, changing the main vegetable component from time to time. You can use potatoes, beetroots, butternut squash, spinach, etc. They can be also ‘veganised’, removing the egg from the mix (try adding some ackee instead) and replacing Parmesan cheese with any dry vegan cheese. And for the sauce? Really, just go with whatever you please: melted butter, toasted nuts, herbs, a light tomato sauce, a spicy sauce, or a classic beef and pork ragù. Have fun and enjoy your food!
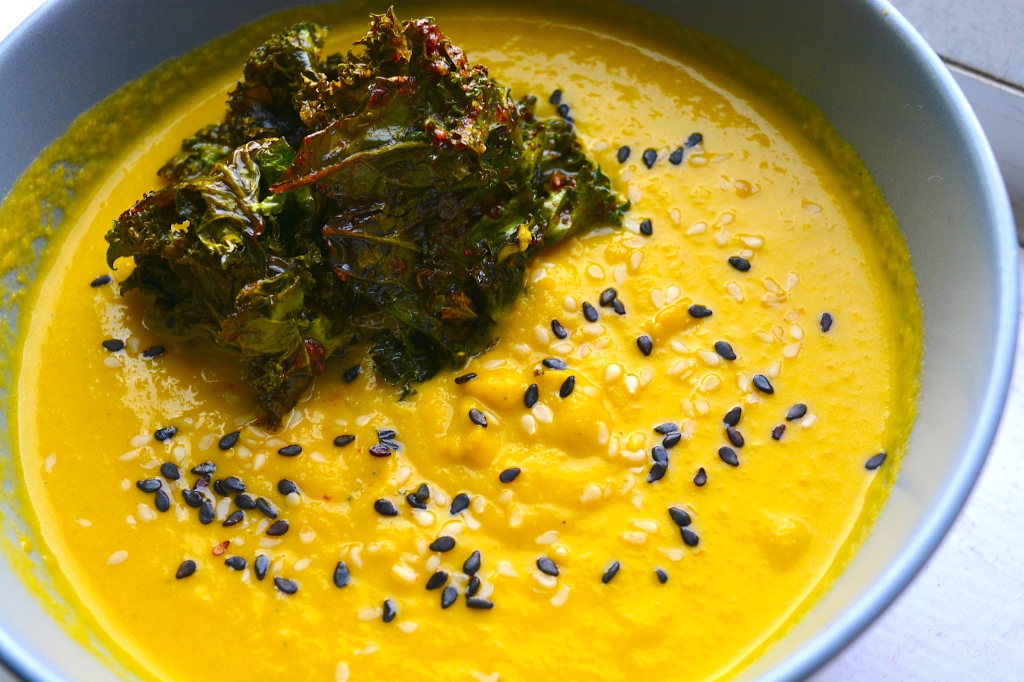
Recipes in this post: KALE CRISPS on a CELERIAC & TOASTED HAZELNUTS SOUP (serves 2 or makes a great starter for 4)
Kale crisps
(use as many kale leaves as you like; EVO oil; salt and spices):
wash and pat dry the kale;
remove stems;
lightly dress the kale leaves with EVO oil and salt; you can replace the salt with any other dry rub, like peri peri, turmeric powder, ground cumin, etc.; do not drench the leaves, just get them slightly shiny, otherwise they will not become crispy;
place the leaves on an oven tray lined with parchment paper; do not overlap the leaves;
bake at 120ºC fan (275ºF) for about 20 minutes, flipping the leaves over after the first ten minutes.
Kale has become a staple in my winter kitchen. It is a lovely vegetable and it matches gloomy weather beautifully. Nevertheless, I do miss the sun, the heat, and I could certainly use less rain on an average week, so these crisps (chips, for those across the Pond) remind me of a child’s summer treat. Kale’s bitterness and sharp edges will give you the perfect British winter feel, while soothing you with its aromatic notes and tannic finish. It is a super easy and fast recipe.
For the prep, I recommend to play the world famous 1960s song (you can check its fascinating story here); sing along, if you know the lyrics, and then enjoy a crunchy feast in your mouth. Use the kale crisps as the perfect garnish for this easy peasy celeriac soup (recipe below) and you will discover a symphony of perfumes and textures that will cure your winter blues in no time.
Celeriac & toasted hazelnuts soup
(1 celeriac; 1 handful of hazelnuts; EVO oil; salt; oat milk/cow’s milk/cream):
remove the celeriac skin and cut it into chunks;
toss the celeriac chunks in a bowl with EVO oil and salt flakes; optional, add 2 tsp of vinegar;
bake at 200ºC fan (425ºF) for about 30 minutes until golden and tender;
while the celeriac bakes, place a few peeled hazelnuts on their own in the oven with just a sprinkle of salt for about 10 minutes till they start to get brown on the edges;
blitz celeriac and hazelnuts with 1 tbsp of EVO oil and 2 tbsp of oat milk, or cow’s milk, or cream (depending on whether you want to keep it vegan, vegetarian, or indulgent on the dairy side); before serving, warm it up in a pot with a glass of water or broth.
‘Have respect’. My Italian 1980s upbringing could be easily summed up with this sentence. Most of our parents had this phenomenally heavy heritage of humbleness that they had to pass on to our generation–blame it on catholicism or their post-fascist education, possibly both, go figure. ‘Have respect’ was a clear warning before any form of action, rather than a reparatory reprehension like the English ‘show some respect’. In a nutshell, live by the saying ‘forewarned is forearmed’ and you might as well dodge mum’s flying slipper.
The ‘have respect’ admonition used to be considered a perfect fit for any purpose: when you addressed other people, when you had to go somewhere and needed to be on time, or when you sat down for a meal, for instance. Because there was always a good reason to have respect and to make sure you did not miss the opportunity to show it.
Today, even though mostly lost culturally-wise, the daunting pseudo psalm ‘have respect’ still survives within every piece of Italian food prepared from the Alps to Lampedusa. It becomes a ritualistic foreword which prevents you from conceiving a pizza with pineapple (unless it is a video prank in Naples), or ask for cream or ham in your pasta carbonara, for example. The same can be said about pesto: it is delicious in its traditional recipe and that is about it.
Pesto genovese is an uncooked, fresh sauce for pasta originating from Genoa. The Ligurian capital, also called The Superb, is as old as its stones–the first settlement actually dates to the Neolithic. The town boasts a traditionally fierce population, mockingly as stingy as its perched-up mountains slanting onto the sea. So, when you deal with pesto, you had better be careful and have respect.
Colours and textures of pesto
The original pesto recipe is registered at the local consortium and includes seven specific ingredients: Genoese DOP (Denominazone di Origine Protetta, i.e. PDO, Protected Designation of Origin) basil leaves, pine kernels, garlic, coarse salt, Sardinian DOP Pecorino cheese, DOP Parmesan cheese, and Ligurian extra virgin olive oil (check our previous post on EVO oil). A traditional serving may well include potatoes and green beans boiled with the pasta, in order to add starchiness and texture to the dish.
Pesto Genovese (serves 2, about 250g of pasta)
BASIL (leaves only), 25g
PINE KERNELS, 8g
GARLIC, 1/2 clove
SALT (coarse/rock), 1 tsp
PECORINO CHEESE (grated), 15g
PARMESAN CHEESE (grated), 35g
EVO OIL, 50ml
Method
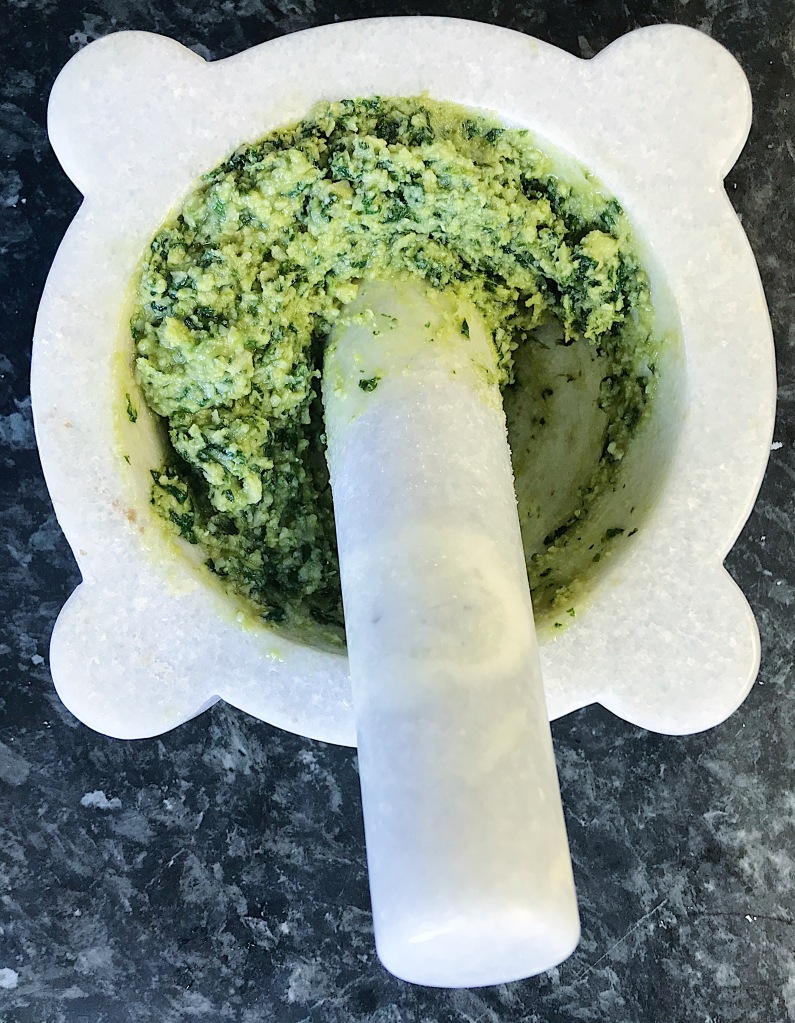
If you want to do it the proper way, get yourself a marble mortar and a wooden pestle–it also works if you use a marble pestle like I do. Work it clockwise while holding the mortar and spinning it in the other direction. Do it as quickly as possible, in order to preserve all the oils from the ingredients and to prevent oxidation, but do not rush it. Give each of the following steps the time you need to properly complete the process.
Grind garlic and the coarse salt till they become creamy.
Add the pine kernels and continue until they are finely ground.
Add the basil leaves and shred them while moving the pestle.
Add the two types of cheese, previously grated.
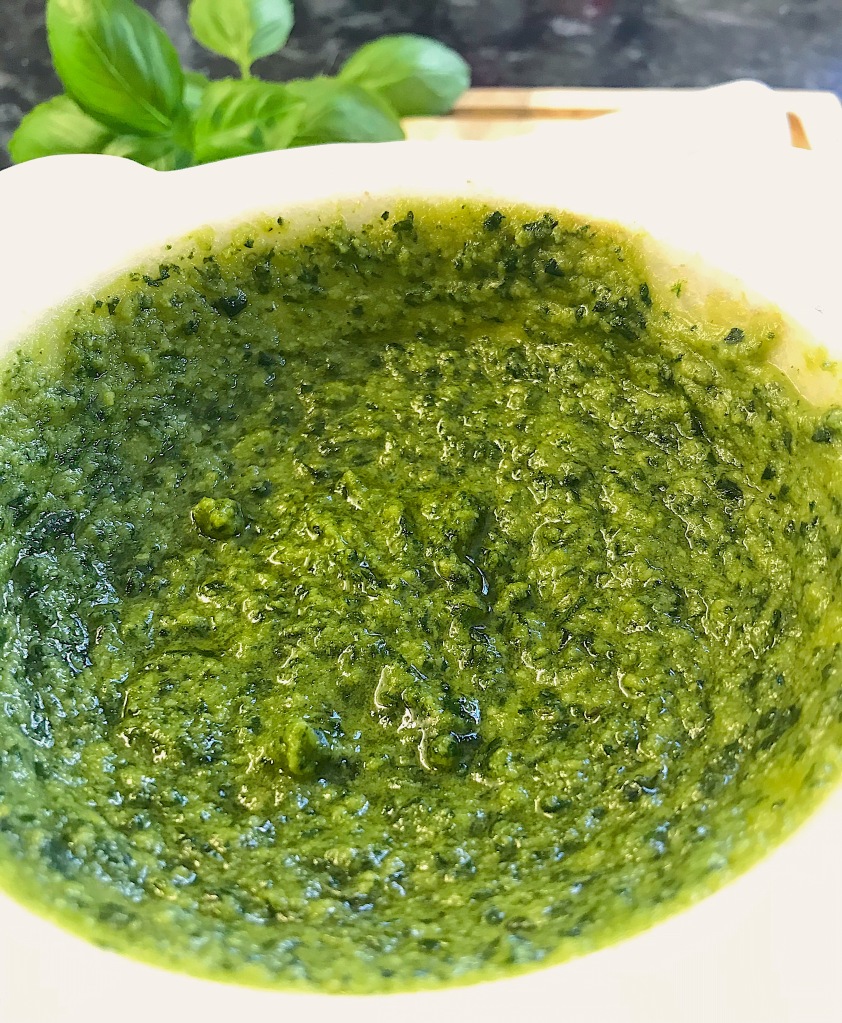
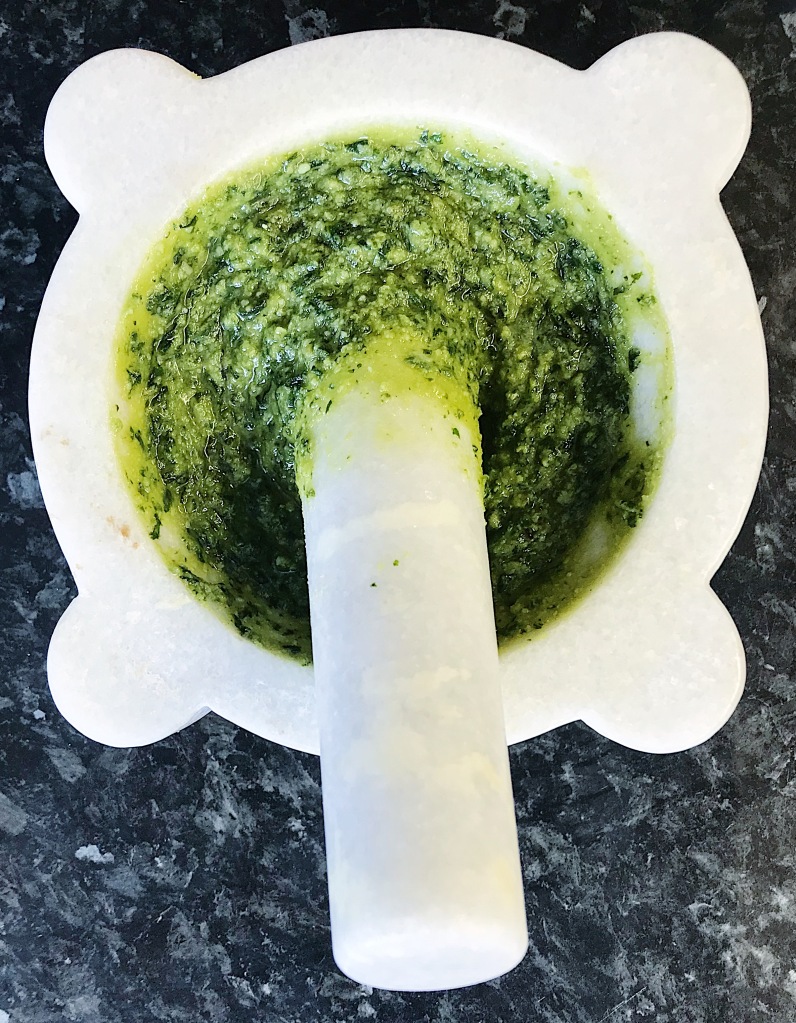
Finish with the EVO oil and work it till the compound is almost smooth, yet preserve some texture of your ingredients.
Steps 3, 4, and 5 of pesto making
If you want to cheat, use can use a hand blender. In this case, I recommend you keep the blades in the fridge for a couple of hours before using the blender and operate it intermittently rather than continuously, so your basil will not bruise during the process and the pesto will not come out brownish.
The beauty of a good pesto starts with its colours palette, ranging over emeralds, dots of forest green, and sapphire shimmers. If it is a respectful pesto, when you eat it you want to feel the textures of its precious ingredients. Sharp, balsamic spikes hit your tongue with every snippet of basil. Salty, crunchy crystals of cheese gently melt in your mouth’s warmth. And it all makes sense as the heat of the pasta melds the flavours together.
An old Genoese saying goes ‘A l’à a belessa de l’ase‘, literally ‘it has the beauty of the donkey’, possibly a linguistic corruption from the French saying ‘La beauté de l’âge’, or ‘The beauty of age’. In any case, a Genoese calling you that could mean that your only good quality is beauty because you are young. Do not get offended, it is still a compliment. Have respect.
Cooking at home has always been a daily activity for me, pretty much since my teens. I have been going through different phases of cooking, and I cannot really say that I have satisfactorily settled with one. There are times when I want to replicate recipes with absolute precision, other periods when I become obsessed with a cuisine style and its ingredients, or various intervals where experimentation takes multiple forms, whether in terms of taste or appearance, for example.
Nebula, oil and vinegar on ceramic
Through constant change, I like to rely on certain essential elements suitable for my cooking. For instance, I still get my rock salt from Italy, as it does not really exist in the UK. The same can be said for other ingredients, such as Abruzzo’s saffron. You can find good alternatives, from India or Iran for example, yet when I am looking for its specific sweet flavour, I need to use the proper Italian crimson stigmas, often combining them with some saffron powder as well.
Similarly, oil and vinegar are equally essential in my kitchen. I should actually say oils and vinegars. Each one has a specific aroma, texture, and cooking performance, so they can be real game changers if aptly used. A basic distinction can be made between broad categories, such as vegetable, seeds, or olive oils, or white and balsamic vinegars. However, the more you experiment and cook with different types, the better you get to choose your ideal flavour enhancer. In some way, you can think of it like wearing a different perfume according to how you feel, your dress code, or the people you are going to be with.
Due to my Italian upbringing and cooking tradition, my selection of oils and vinegars is a ‘tad’ biased and strongly leans toward Italian products. I linked some of the producers’ websites, but none of the products below are sponsored or promoted. These are just my home kitchen flavour buddies. Let’s have a look at my oil bottles.
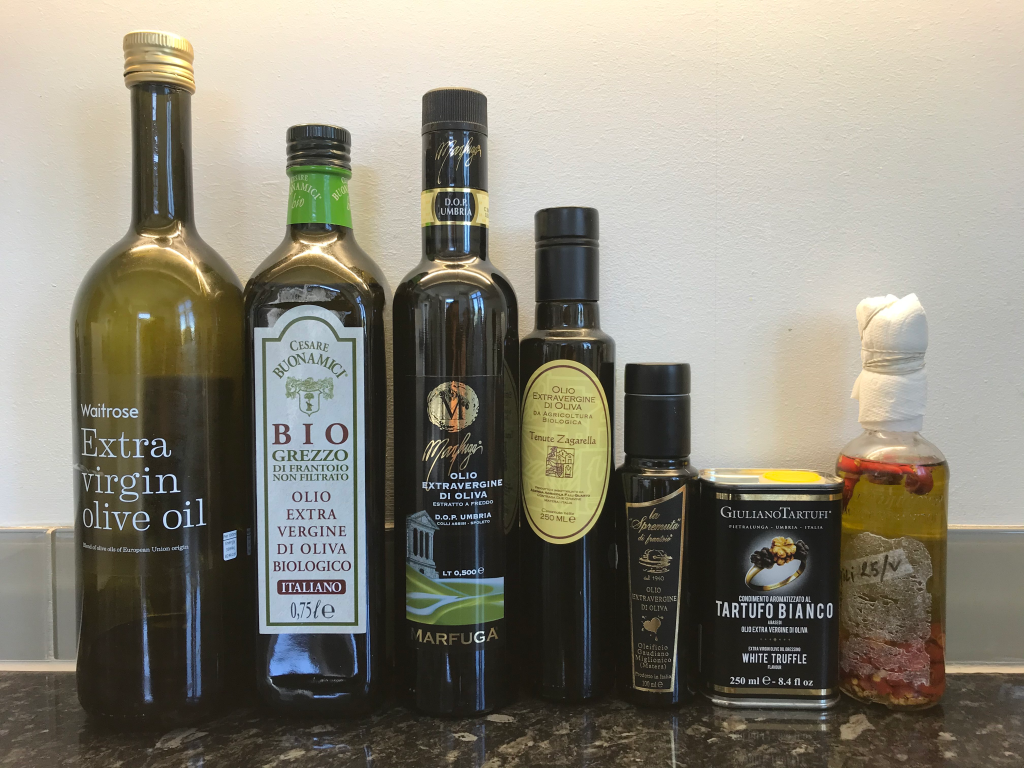
My home kitchen oils
My dream team includes a range of oils I can use for cooking, marinades, dressings, or just plain raw, plus some flavoured ones. I use Waitrose Extra Virgin Olive oil for everyday cooking, as it is a decent EVO oil, with a mild flavour, quite versatile, and it is cheap. I use it for frying, marinades for meat, or as a base for spicy dressings.
The second bottle on the left is currently my good EVO oil to be used raw. It is a Tuscan oil from Fiesole, with a light yellow colour and an elegant flavoursome finish, quite silky on the tongue and slightly robust in the throat. This kind of oil is perfect for fresh salads, or to snack on some crispy vegetable, such as bell peppers or celery.
The three bottles in the middle of the picture are my ‘luxury’ EVO oils. I only open these when I find freshly-baked bread, or buy some serious fish, or get my hands on some proper burrata. If in luck with the food, a small bottle of these might easily not survive one sitting.
The taller bottle, Marfuga EVO oil, is what I call a green oil, and I am a sucker for it. This oil from Umbria has a superb finish, which feels like a gentle tingle on the sides of your tongue, while warm balsamic perfumes fill your mouth. Because of its taste, I associate it with the colour green and it makes me happy just smelling it.
The other two smaller bottles are EVO oils from Matera, organic gems from two small producers. They are as intense as fresh and mark an aromatic, long-lasting groove on your tongue. These are delicious oils; I can spend a good five minutes only enjoying their natural fragrance when I open a bottle.
The small can and the reuse bottle are my flavoured oils. The can contains EVO oil with white truffle aroma, good for cooking and also useful to dress some cooked food, such as chips or red meat. The reuse bottle contains EVO oil with chopped bird’s eye chillies. I prefer to make small quantities of spicy oil and I use fresh chillies—which is probably an abomination to purists, as you should use dried chillies in order to make a classic chilli oil. Using the fresh chillies allows me to have a clean EVO oil flavour with a sharp spiciness from the chillies, rather than the typical round, spicy hot flavour of a classic chilli oil.
Sometimes I also buy vegetable oil, if I know I will deep fry something, or if I am making a carrot cake, for instance. Because I do not use this type of oil very often, it tends to be a buy-on-requirement only item, hence the exclusion from the group above.
Looking at my vinegars, I am possibly even more a glutton than a cook. Different vinegars inspire so many of my food memories. I use vinegars for cooking, marinades and dressings, and I secretly have an occasional sip of my reserve bottles. I do not use just one type of vinegar and there are so many shades of flavour that I have several opened bottles on my kitchen counter.
My home kitchen vinegars
The first one on the left is a sherry vinegar, which I discovered when cooking with chef Gabriel Waterhouse at the Water House Project. We first used it to caramelise banana shallots braised in apple juice and thyme, which we used to serve with polenta, as a vegetarian alternative to one of our mains. This vinegar is perfect for colouring food in the pan and it leaves a quite sharp finish, distinctly different from the sweetness you would get from a balsamic vinegar, for instance. Notes of wood are still detectable in its aroma and it feels smooth and clean on the palate.
The small bottle of Filippo Berio balsamic vinegar is a rather ordinary IGP balsamic vinegar. It is acidic and young, it contains caramel, and I use it only for meat marinades, such as a šašlik/shashlik (pork or chicken marinated for skewers to be charred on the grill). It is runny and quite sharp for a balsamic vinegar, so I find it good only for limited cooking purposes.
In a nutshell, balsamic vinegar can be Modena IGP (Indicazione Geografica Protetta) or Tradizionale di Modena/di Reggio Emilia DOP (Denominazione di Origine Protetta). The striking difference lies in two main factors, ingredients and aging. IGP allows the presence of other grapes’ vinegar and limited quantities of caramel, whereas DOP is made only with endemic DOC grapes (like Lambrusco, Ancellotta, Trebbiano, Sauvignon, Sgavetta, Berzemino), which are cooked right after pressing. Also, the IGP needs a minimum of 60-day aging to obtain the badge and can be called ‘aged’ after 3 years, whilst the DOP requires a minimum of 12 years of aging. If you do not mind waiting, the Tradizionale di Modena DOP ExtraVecchio requires a minimum of 25 years of aging.
The process of making balsamic vinegar is as relentless as it is elegant. The cooked grape must is sealed in wooden barrels for aging. With time, the vinegar reduces and it is moved to smaller and smaller barrels made of different wood (such as chestnut, durmast, cherry tree, and juniper), until it is ready. It is this long process of ripening which makes aging the real game changer.
The third bottle in the picture is a red wine vinegar from Reggio Emilia made with 100% Nebbiolo grapes, aged in oak barrels. It is not a balsamic vinegar, although it is produced with traditional methods by specialists of balsamic vinegar. It is fluid, with shades of brown and burgundy, gentle at the nose, yet punctual on the tongue. It is just lovely. This vinegar is exceptional on fresh vegetables and fish, as much as used for raw marinades.
The flask-shaped bottle is a luscious IGP, made by the oldest balsamic vinegar producer in Italy, Giuseppe Giusti, founded in 1605 (they even have a museum). It is made with must of cooked sun-dried grapes and aged wine vinegar, offering a powerful balsamic bouquet with a sweet, flavoursome finish. Its intensity makes it rather perfect for dressing on anything salty, but it is also great to glaze meat or strongly flavoured vegetables, like an aubergine steak for instance.
The next bottle is a prepared dressing with balsamic vinegar IGP. It comes from a deli shop in Parma, but it is produced in Reggio Emilia. This is perfect for salads or vegetable marinades, as it is slightly viscous and sweet on the palate. It performs similarly to commercial balsamic glazes, but it has no added sweetener such as honey or maple syrup, so it does not get sticky.
The two squared bottles are balsamic vinegar vintage reserves, the tall one coming from Acetaia Pagani, and the tiny inkwell sealed with wax from Giuseppe Giusti. They could be compared to a cuvée, as in selected prime grapes of one year.
The tall bottle from Acetaia Pagani has an insane consistency, practically impossible to describe without a degree in chemistry or physics. Even if you capsized the bottle, the vinegar would not accelerate during its fall, remaining perfectly fluid at the right density. The flavour of this vinegar is a precise equilibrium between sweet and savoury, with woody berries on the nose. I love it on strawberries accompanied by Parmesan cheese, a typical snack around Modena, as much as it tastes magic on red meat or grilled halloumi, for example.
Similarly, the inkwell contains a beautifully aged balsamic vinegar reserve, which is simply delectable. The bottle in the picture is still closed, but I had the pleasure to taste it some months ago in Milan. It is slightly fluid, yet it changes texture once opened and applied onto any food. It could be compared to lacquer, as it sets after a few minutes from use. This vinegar becomes like a flavour encasing, although without solidifying, since it releases its fruity aroma and melts on the tongue just with the warmth of your mouth. Similarly to the other balsamic vinegar reserve, it tastes fantastic when used in sweet and savoury contrasts, especially when punched by a salty flavour.
The last two bottles are quite basic vinegars that I use for cooking. Waitrose’s IGP is great for glazing food in a pan or for meat marinades before roasting. It is quite mild and makes a good base for stronger flavours, as it has no added sweeteners. The white wine vinegar at the end of the line is my go-to item for making ricotta at home, or also great for sharp, light pickling of vegetables such as radishes.
Growing up in Italy and pretty much spending a lot of time in the kitchen every day since I was a child, I learnt quite early how to use oils and vinegars for different types of food. But it certainly does not mean I know something or that these oils and vinegars above are my definitive dream team: I am always experimenting and still exploring new flavours and traditions.
Back in January 2016, I started blogging about some of my favourite home recipes. I wanted to share my passion for cooking, while introducing my genuine Italian food culture. I also dragged in my friend Maria, an excited foodie who happens to make delicious desserts. We started our blog Foodamaze, wanting to publish more or less weekly, alternating a recipe each. Then, summer 2016 marked a series of unexpected and rather life-changing events, and Foodamaze went slowly dormant for almost four years, till now.
Meanwhile, I saw my kitchen life going through a rather exciting evolution: my then casual catering activity Matango London slowly became a full-time commitment, with exciting exploits in a few London restaurants, Taste of London, and extravagant private events. Later, in 2018, I became the sous chef of Gabriel Waterhouse, the mastermind chef behind one of the most inspiring and successful fine dining experiences in London, The Water House Project. After this truly game-changing experience, I became the senior-sous chef of Madera at Treehouse Hotel, till the outbreak of the Covid-19 virus and the subsequent global lockdown.
Last year, I created the platform called FoodVcancer to help fundraising for people suffering from sarcoma and other cancers. The idea is to broadcast on social media some home cooking time I spend with the patients, while supporting healthy eating and honest nutrition choices. My own experience with sarcoma and insatiable appetite give me the essentials, the rest usually comes naturally in a completely off-the-cuff flow. FoodVcancer also got me to become a judge of the Great Taste Awards at the Guild of Fine Food, exploring the mechanics of quality ranking without the despotism of brands—I owe this extraordinary opportunity to a simply fabulous lady foodie, Maya Orr.
photo by Gabe Waterhouse
So here I am now, reviving Foodamaze pretty much out of the blue, with the same intention of sharing the food I truly enjoy. It could be an impromptu fridge-emptier dish, or an engineered fine-dining-wannabe, or maybe just my oil and vinegar selection from my kitchen cupboard. I ignore how much I will keep going with writing it, with what frequency, and if it will ever mean anything. I just have a compulsive need to write and expose my food devotion.
Today, even more than ever, cooking is to me something exceptional. I believe in its pure alchemy, as cooking means mastering the art of transmutation and sublimating the harmful into delicious. I equate this with love. Plus, cooking is fun, is catharsis, it charms you into taming danger, while it revolves in constant variations. Food animates a choir of human senses, its music accented by trills wafting down our emotional core. Food is home. Cooking is hearth.